Dive into a world of creativity with our selection of 25 stylish nail designs that you simply must try out in 2024. From classic and elegant to bold and eccentric, these ideas will give your look a unique charm and style.
- 1. French manicure
- French manicure is a classic and always relevant style that gives your nails a well-groomed and stylish look. Here is a quick guide on how to do it:
- Here’s a rundown of the advantages and disadvantages of French manicures:
- 2. Latte Nails
- Here’s a quick guide to creating a latte manicure:
- Here’s a rundown of the advantages and disadvantages of a latte style manicure:
- 3. Muted Mocha
- Here is a quick guide to creating the Muted Mocha manicure:
- Here’s a rundown of the advantages and disadvantages of a muted mocha manicure:
- 4. Textured ombré
- Here is a quick guide to creating a textured ombre:
- Here’s a rundown of the advantages and disadvantages of a textured ombré manicure:
- 5. Monochrome
- Here is a quick guide to creating a monochrome manicure:
- Here is a summary of the advantages and disadvantages of a monochrome style manicure:
- 6. Pearl White
- Here is a quick guide to creating a pearly white manicure:
- Here’s a quick rundown of the advantages and disadvantages of a pearl white manicure:
- 7. Vanilla Chrome
- Here is a quick guide to creating a vanilla chrome manicure:
- Here’s a rundown of the advantages and disadvantages of a vanilla chrome manicure:
- 8. Walnut Brown
- Here’s a quick guide on how to create a Brown Walnut manicure:
- Here is a summary of the advantages and disadvantages of a manicure with the color “walnut brown”:
- 9. Minimalist chic
- Here’s a quick guide for creating a minimalist chic manicure:
- Here’s a rundown of the advantages and disadvantages of minimalist chic:
- 10. Green Forest
- Here’s a quick guide to creating a Green Forest style manicure:
- Here’s a brief description of the advantages and disadvantages of the Green Forest manicure:
- 11. Embellished Blue
- Here’s a quick guide for creating a Blue with Embroidery manicure:
- Here is a brief description of the advantages and disadvantages of manicure with jewelry in blue:
- 12. Mixed Contrast
- Creating a Mixed Contrast manicure is a great way to add originality and brightness to your look. Here’s a quick tutorial:
- Here’s a rundown of the advantages and disadvantages of a mixed contrast manicure:
- 13. Unusual and festive
- Creating a manicure that looks unusual and festive can add majesty and fun to your look. Here’s a quick guide:
- Here is a summary of the advantages and disadvantages of an unusual and festive manicure:
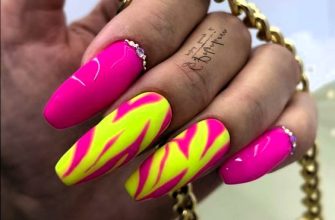
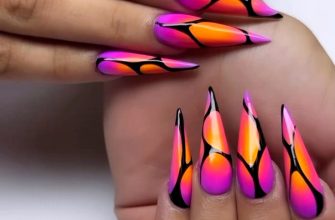
- 14. 3D Neon
- Creating a 3D Neon manicure is an exciting way to give your nails a colorful and spectacular look. Here’s a quick tutorial:
- Here’s a quick summary of the advantages and disadvantages of the 3D Neon manicure:
- 15. Double tones
- Double tones nail art is a chic and trendy way to add depth and dimension to your manicure. Here’s a brief guide on how to achieve this stylish look:
- 16. Freckles on nails
- Freckles on nails is a charming and playful nail art design that adds a touch of whimsy to your manicure. Here’s a quick guide on how to achieve this fun look:
- Here is a summary of the advantages and disadvantages of Freckles on nails manicure:
- 17. Glitter Bomb
- Creating a glitter bomb manicure is a fantastic way to add sparkle and glamour to your nails. Here’s a step-by-step guide to achieve this dazzling look:
- Here’s a quick summary of the advantages and disadvantages of the Glitter Bomb manicure:
- 18. Jolly Cherry
- Creating a Jolly Cherry manicure is a delightful way to add a pop of color and fun to your nails. Follow these steps to achieve this playful look:
- Here’s a summary of the advantages and disadvantages of the Jolly Cherry manicure:
- 19. Velvet Tips
- Creating a Velvet Tips manicure is a luxurious way to add texture and sophistication to your nails. Here’s a step-by-step guide to achieve this elegant look:
- Here’s a quick summary of the advantages and disadvantages of the Velvet Tips manicure:
- 20. Pastel curls
- Creating a Pastel Curls manicure is a whimsical and playful way to add a touch of charm to your nails. Here’s how you can achieve this delicate design:
- Here’s a summary of the advantages and disadvantages of the Pastel Curls style manicure:
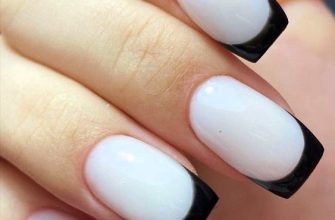
- 21. Black and white
- Creating a black and white manicure offers endless possibilities for chic and sophisticated nail designs. Here’s a simple guide to achieving a stunning black and white manicure:
- Here’s a rundown of the advantages and disadvantages of the Black and White manicure:
- 22. Cool Emerald
- Creating a cool emerald manicure brings a touch of elegance and sophistication to your nails. Here’s a guide to achieving this stylish look:
- Here is a summary of the advantages and disadvantages of the Cool Emerald style manicure:
- 23. Holographic Manicure
- Creating a holographic manicure adds a futuristic and mesmerizing touch to your nails. Here’s how you can achieve this eye-catching look:
- Here’s a rundown of the advantages and disadvantages of a holographic manicure:
- 24. Smiley Face Nails
- Creating smiley face nails is a fun and playful way to add a touch of whimsy to your manicure. Here’s how you can achieve this cheerful design:
- Nail smiley faces are a fun and expressive way to express your personality and lift your mood. Here’s a brief description of their advantages and disadvantages:
- 25. Foil French
- Creating a foil French manicure adds a touch of elegance and sophistication to your nails. Here’s a step-by-step guide to achieve this glamorous look:
1. French manicure
The French manicure is a classic and always relevant choice for those who prefer a delicate and well-groomed look for their nails. It is characterized by a natural shade of the nail plate with a white stripe on the tips, creating an elegant and stylish look. This type of manicure is suitable for any occasion, be it a formal event or a casual outing.


French manicure is a classic and always relevant style that gives your nails a well-groomed and stylish look. Here is a quick guide on how to do it:
- Preparation: Start by cleaning the nail plate and removing any residue of the previous varnish. Trim and correct the shape of your nails with a crescent moon, and then apply a base coat.
- White edge: Using white varnish or gel, or special false lines, apply white to the edge of the nail, forming the characteristic line of a French manicure. Allow it to dry completely.
- Pink color: After the white color has dried, apply a delicate pink polish or gel to the entire surface of the nail. Let it dry as well.
- Finish coat: Finish your manicure with a protective top coat to ensure a shiny finish and keep your manicure looking good for a long time.
And there you have it! Your nails look fresh and stylish, ready to impress with their classic beauty.
Here’s a rundown of the advantages and disadvantages of French manicures:
Advantages:
- Classic look: The French manicure has a classic and elegant appearance that is suitable for both everyday and special occasions.
- Versatility: It suits every style of clothing and many events, thanks to its neutrality and elegance.
- Manicured look: The French manicure makes nails look manicured and gives them a natural shine.
Disadvantages:
- Difficulty performing: Creating the perfect white strip can be difficult for beginners, requiring a certain skill and patience.
- Limited design options: Because French manicures are usually limited to a white strip at the tips of the nails, they can feel boring for those who prefer brighter, more original designs.
- Short-lived: White paint on nail tips can chip or soften over time, requiring regular updates.
2. Latte Nails
Latte nails are a delicate and elegant design inspired by the shade of coffee latte. It usually features a natural or light beige nail plate color that resembles the shade of freshly brewed coffee. This design is perfectly combined with various accents such as gold patterns, pearlescent shades or delicate rhinestones, giving your nails a unique charm and sophistication. Latte nails are perfect for both everyday looks and special occasions, adding a touch of coziness and luxury to your style.


Here’s a quick guide to creating a latte manicure:
- Preparation: Start by cleaning your nail plate and removing any residue from previous polish. Trim and shape your nails, then apply a base coat.
- Base Color: Apply natural or light beige polish over the entire nail surface as a base color, resembling the shade of a fresh coffee latte. Allow it to dry completely.
- Decor: Add additional accents to add more charm to your manicure. These can be gold or white designs, stickers, or accessories such as small pebbles or various glitters.
- Finish coat: Finish your manicure with a protective top coat to provide long-lasting shine and protect the design from scratches and chips.
And there you have it! Your nails now look like a freshly brewed cup of latte coffee, ready to impress with their elegance and warmth.
Here’s a rundown of the advantages and disadvantages of a latte style manicure:
Advantages:
- Natural and delicate look: A latte style manicure creates a delicate and natural look on your nails, suitable for both everyday and special occasions.
- Versatility: Latte shades go well with a variety of clothing styles and can suit different skin types, making them a versatile choice for many women.
- Simple and easy to maintain: Lighter shades can easily hide minor imperfections and imperfections on the nails, and are less prone to peeling and abrasion.
Disadvantages:
- Limited color choices: Latte shades can limit manicure design options compared to brighter colors.
- Requires regular refreshing: Lighter shades may be more prone to smudging and fading, requiring more frequent manicure refreshing.
- Not suitable for all seasons: Latte style manicures may be less suitable for brighter and sunnier seasons such as summer, preferable for the fall and winter months.
3. Muted Mocha
Muted Mocha is a sophisticated nail design inspired by the shade of coffee mocha. Usually, dark brown or chocolate shades are used in this design, which give the nails depth and warmth. This style goes well with a matte or glossy finish, and can be embellished with additional elements such as gold or silver accents. Muted mocha nails add sophistication and elegance to the look, emphasizing your individual style with sophisticated charm.


Here is a quick guide to creating the Muted Mocha manicure:
- Preparation: Start by cleaning the nail plate and removing any residue of the previous polish. Trim and shape your nails, and then apply a base coat.
- Base color: Choose a dark brown or chocolate polish that resembles a mocha shade. Apply this color to the entire surface of the nail and let it dry completely.
- Matte finish (optional): Use a matte top coat to add more depth and subduedness. It will change the texture of the polish, making it more subdued and sophisticated.
- Additional accents (optional): If you want to add more interest, use gold or silver elements, such as rhinestones or designs, to create accents.
- Finishing: Finish your manicure with a protective top coat to ensure long-lasting shine and protect your design from scratches and chips.
The result is a Muted Mocha manicure that resembles the colors and atmosphere of delicious coffee and adds depth and style to your look.
Here’s a rundown of the advantages and disadvantages of a muted mocha manicure:
Advantages:
- An understated and elegant look: A muted mocha manicure creates a sophisticated and stylish look on your nails, suitable for both everyday and special occasions.
- Versatility: Mocha shades go well with different clothing styles and can suit different skin types, making them a versatile choice for many women.
- Practicality: Dark mocha shades can hide minor imperfections and flaws on the nails, making them ideal for those who want to perfect their manicure.
Disadvantages:
- Limited styling options: Muted mocha shades can limit manicure design options compared to brighter colors.
- Dark shades require careful application: Dark er polishes may be less easy to apply and require more careful application to avoid smearing or smudging.
- Not suitable for all seasons: A muted mocha manicure may not be suitable for brighter and sunnier seasons such as summer, preferable for the fall and winter months.
4. Textured ombré
Textured ombré is a sophisticated and stylish nail design that combines two popular techniques: ombré and texturing. In this design, shades seamlessly transition into each other, creating a harmonious gradient of color. However, instead of an even and smooth transition, texturing is used, adding an interesting and unusual effect. This style is perfect for those who are looking for something new and original in manicure, giving their nails sophistication and refinement.


Here is a quick guide to creating a textured ombre:
- Preparation: Start by cleaning the nail plate and removing any residue of the previous polish. Trim and shape your nails, and then apply a base coat.
- Choose colors: Choose two or more colors that harmonize with each other and are suitable for creating an ombre effect. They can be in the same color scheme or different shades.
- Apply the first color: Apply the first color to the entire nail bed, leaving the tips of the nails unpolished.
- Creating an ombre: Apply the second color from the tips of the nails to the middle of the nail, where it blends with the first color. For a textured effect, use a sponge or a special brush to make the transition smoother and add texture.
- Adding texture (optional): If you want to increase the texture, you can add additional elements such as glitter, sand, or texture paste. Apply them on top of the already dried polish or incorporate them into an ombre effect.
- Finish: Finish the manicure with a protective top coat to ensure a long-lasting shine and protect the design from scratches and chips.
The result is a textured ombre that will add depth, interest, and personality to your manicure.
Here’s a rundown of the advantages and disadvantages of a textured ombré manicure:
Advantages:
- Unique look: A textured ombré manicure creates an interesting and impactful visual look by combining different textures and shades on your nails.
- Creative: This style of manicure offers ample opportunity to experiment with colors, textures and shades, allowing each woman to create a unique design.
- Stylish and modern: Textured ombré manicure is a trendy and fashionable nail design option that is suitable for a variety of casual and special occasions.
Disadvantages:
- Difficult to create: Creat ing a textured ombré manicure may require some skill and experience with different textures and shades of nail polish.
- Requires more time: This type of manicure can take longer to apply and dry layers, especially if special techniques or effects are used.
- Difficult to maintain: Some textures or shades may require special care or maintenance to keep the manicure looking good for a long time.
5. Monochrome
Monochrome manicure is a stylish and versatile design based on the use of shades of one color or its different shades. In this style, each nail can be covered with a single shade, or a variety of combinations of shades within the same color scheme are created. This manicure is suitable for any occasion and can be easily combined with different outfits and styles. Due to its simplicity and elegance, monochrome manicure is a popular choice among those who appreciate minimalism and stylishness.


Here is a quick guide to creating a monochrome manicure:
- Preparation: Start by cleaning the nail plate and removing any residue of the previous polish. Trim and shape your nails, and then apply a base coat.
- Choose a color: Choose one color or shades of one color to be the basis of your manicure. Monochrome manicure can be done in any shade, from light to dark.
- Applying the base color: Apply the selected color to the entire nail layer, evenly distributing the varnish. Let it dry completely before moving on to the next step.
- Adding texture (optional): If you want to add texture, use a special texture polish or elements such as sand or glitter to create an interesting effect on your nails. Apply them to the already dried polish.
- Finishing: Finish your manicure with a protective top coat to ensure long-lasting shine and protect your design from scratches and chips.
Thus, you will get a monochrome manicure that looks stylish, modern, and elegant, suitable for everyday use as well as for special occasions.
Here is a summary of the advantages and disadvantages of a monochrome style manicure:
Advantages:
- Style and elegance: Monochrome manicure offers a minimalistic and classy look that is suitable for various casual and special occasions.
- Versatility: A monochrome nail design can easily be paired with any outfit and accessories, making it the perfect choice for a variety of events.
- Easy to Create: This manicure style is usually easier to create and maintain than more complex and colorful designs.
Disadvantages:
- Monotony: Some may find monochrome manicures too boring or not expressive enough compared to more colorful and varied designs.
- Limited choice: Because of the limited number of colors, monochrome manicures may seem less varied and original.
- Visibility of imperfections: Monochromatic designs can emphasize nail imperfections such as scratches or bumps, which may require additional prep and maintenance.
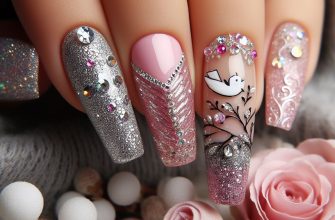
6. Pearl White
Pearl white manicure is a refined and elegant design that embodies tenderness and luxury. In this style, the nails are covered with white lacquer, which gives them a delicate shade of pearl. This manicure is often complemented with additional elements, such as pearl accessories or sequins, to add even more sophistication. A pearl white manicure is perfect for special events or weddings, creating a sophisticated and luxurious look.


Here is a quick guide to creating a pearly white manicure:
- Preparation: Start by cleaning the nail plate and removing any remnants of the previous varnish. Trim and shape your nails, and then apply a base coat.
- Choosing a polish: Choose a pearlescent white polish. This type of polish has a pearlescent undertone that gives your nails a delicate shine and sophistication.
- Application: Apply the first coat of polish to the entire nail bed and wait for it to dry completely. Then apply a second coat for more color saturation and shine.
- Adding additional accents (optional): If you want to add an extra accent, use small glitter or mother-of-pearl plates that can be applied to individual nails or used to create a design.
- Finish: Finish your manicure with a protective top coat to ensure long-lasting shine and protect your design from scratches and chips.
Thus, you will get an elegant and sophisticated pearlescent white manicure that is suitable for everyday use as well as for special occasions.
Here’s a quick rundown of the advantages and disadvantages of a pearl white manicure:
Advantages:
- Elegance: A pearl white style manicure gives your nails an elegant and sophisticated look, emphasizing their natural beauty.
- Versatility: This shade is suitable for a variety of events and styles, adding a touch of luxury to any look.
- Combination: Pearl white blends well with other shades and designs, allowing you to create a variety of combinations and nail jewelry.
Imperfections:
- Visibility of imperfections: This light shade can emphasize nail imperfections such as scratches or bumps.
- Requires regular maintenance: A pearl white manicure may require more maintenance and frequent refreshing due to its tendency to smudge and fade.
- Careful comb inations: Some combinations of colors and designs can make a pearl white manicure too bright or obtrusive, so care is required when choosing jewelry and accessories.
7. Vanilla Chrome
Vanilla Chrome is a stylish and modern manicure design that combines the delicacy of a vanilla shade with a chrome effect. This type of manicure creates a sophisticated and elegant look, drawing attention to the nails. Vanilla color gives the manicure tenderness and femininity, and the chrome effect adds a modern chic and style to it. This design is perfect for both everyday looks and special occasions, giving your nails a special charm and shine.


Here is a quick guide to creating a vanilla chrome manicure:
- Nail preparation: Start by cleaning the nail plate and removing any residue of the previous varnish. Trim and shape your nails, and then apply a base coat.
- Apply the base color: Choose a vanilla cream polish. Apply the first coat of polish to all nails and wait until it is completely dry. Then apply a second coat for a richer color.
- Apply a chrome coating: After the polish has dried, apply a thin layer of chrome coating to the tips of your nails. Use special chrome pigments or gel polishes that can be activated under a UV/LED lamp.
- Create a chrome effect: After applying the chrome coating, use an applicator or a silicone brush to thoroughly wipe the coating on your nails. This will help create a shiny chrome effect.
- Finishing: Finish your manicure with a protective top coat to ensure a long-lasting shine and protect your design from scratches and chips.
Thus, you will get an elegant and stylish vanilla chrome manicure that will suit any occasion and add charm and fashionable look to your look.
Here’s a rundown of the advantages and disadvantages of a vanilla chrome manicure:
Advantages:
- Stylish effect: Vanilla chrome creates a trendy and stylish effect on your nails, giving them a modern and colorful look.
- Versatility: This shade goes well with different clothing and makeup styles, making it versatile for different events and everyday use.
- Sophistication: With its metallic hue, vanilla chrome adds a touch of sophistication and luxury to your look.
Disadvantages:
- Requires careful maintenance: A vanilla chrome manicure may require more careful maintenance and regular refreshing due to its tendency to scratch and peel.
- Not suitable for all nail types: On weak or damaged nails, the chrome effect may look less effective and fade faster.
- May look deviant: Some people may find vanilla chrome too bright or deviating from traditional shades, which may not be desirable for those who prefer more classic styles.
8. Walnut Brown
Walnut brown is a warm and cozy shade that is perfect for creating an elegant and stylish manicure. This color resembles the shade of ripe nuts and gives your nails a natural appeal. Walnut brown manicure can be both neutral and classic, and bold and expressive, depending on your preferences and mood. This shade blends perfectly with various designs, from minimalist to more complex and sophisticated, making it a versatile choice for any occasion.


Here’s a quick guide on how to create a Brown Walnut manicure:
- Nail Preparation: Start by cleaning your nail plate and removing any residue from the previous polish. Determine the ideal shape of your nails, trim and shape them as desired. Complete the preparation by applying a base coat, which will help protect your nails and prolong the durability of your manicure.
- Applying the base color: Choose a dark brown nail polish that resembles the shade of a ripe walnut. Apply two even coats of polish to each nail, letting each coat dry well between applications. This will create a rich and deep color.
- Texturizing (optional): If you want to add a textural effect, consider using a matte or textured polish. Apply it over your main color or create an accent nail with this polish.
- Decorating: To add interest and personality to your manicure, you can use various decorative elements. These can be metallic elements, rhinestones, sequins or stickers. Apply them to the nails carefully with tweezers or a special brush.
- Finishing: After the decor is dry, fix the manicure with a layer of top coat. This will help keep the decorative elements in place and give your manicure extra shine and durability.
Thus, you will get an elegant and stylish manicure in the style of “Brown Walnut”, which is suitable for both everyday looks and special occasions, giving your look warmth and sophistication.
Here is a summary of the advantages and disadvantages of a manicure with the color “walnut brown”:
Advantages:
- Natural look: Walnut brown color gives your nails a natural and warm look, making it versatile and suitable for different events and everyday use.
- Style and Elegance: This shade of brown is usually associated with warmth and elegance, adding nuance and depth to your look.
- Combination: Walnut brown blends well with other shades such as beige, gold, cream and even black, allowing you to create varied and stylish combinations.
Disadvantages:
- Limited style options: Using walnut brown can limit your choice of manicure designs and styles, as not all patterns and elements go well with this shade.
- Understated: Unlike bright or saturated colors, walnut brown can appear too muted or inconspicuous, especially on shorter nails, which can reduce the impact of the manicure.
- Not suitable for all skin tones: Despite its versatility, nut brown may not look its best on all skin tones, so it’s important to choose a shade that suits your skin tone.
9. Minimalist chic
Minimalist chic is an elegant and stylish approach to manicure, which is preferred by many fashionistas. It is characterized by clean lines, delicate shades and a minimal amount of decorative elements. This manicure often uses neutral or pastel colors such as beige, light pink or gray, which give the nails a refined and elegant look. The main rule of minimalist manicure is that less is more, so the design usually features simple and simple patterns, such as thin lines, geometric shapes or abstract patterns. This manicure is perfect for both everyday looks and special occasions, giving your style sophistication and understated elegance.


Here’s a quick guide for creating a minimalist chic manicure:
- Nail Preparation: Start by thoroughly cleaning your nail plate and removing any residue from previous polish. If necessary, trim the shape of your nails and remove cuticles. Finish by applying a base coat to protect your nails and improve adhesion.
- Color choice: For a minimalist manicure, choose neutral or pastel shades. These can be beige, light pink, peach or light gray colors. They are great for creating an elegant and understated look.
- Single color: Apply two thin and even coats of your chosen nail polish on each nail. Ensure complete drying between coats to avoid bubbles or smudges.
- Minimalistic patterns: To add interest to your manicure, you can use minimalistic patterns or designs. These can be thin lines, geometric shapes or abstract patterns. Use a brush or sharpening tool to create these patterns.
- Accent elements: If you want to add some originality to your manicure, consider adding an accent nail. This could be applying a different shade of polish to one of your nails or creating a miniature pattern that is different from the rest of your nails.
- Finish: Once the polish is completely dry, fix your manicure with a layer of top coat. This will help maintain the color and design of your nails, as well as give them extra shine and staying power.
Here’s a rundown of the advantages and disadvantages of minimalist chic:
Advantages:
- Elegance: Minimalist chic is elegant and stylish, creating a sophisticated and understated look.
- Versatility: Minimalism is suitable for every occasion and event, from casual looks to special events, due to its versatility and sophistication.
- Combination: Simple designs and clean lines can easily be combined with other closet pieces and accessories, making minimalist style very versatile.
- Practicality: Minimalist manicures not only look elegant, but are also practical for everyday life as they are low maintenance and suitable for a variety of situations.
Disadvantages:
- Limited design options: A minimalist manicure can appear boring or monotonous due to the limited number of elements and designs.
- Requires flawless execution: Since minimalist manicures are based on simplicity and clean lines, any flaws or errors in execution can immediately catch the eye.
- Not suitable for everyone: For some people, minimalist style may seem too boring or not expressive enough, so it is not always suitable for all preferences and styles.
- Requires careful maintenance: While minimalist manicures can be practical, they still require careful maintenance to maintain their elegant look and not look deteriorating.
10. Green Forest
The Green Forest manicure is a fresh and organic design inspired by nature and green shades of foliage. It includes a variety of shades of green color, which reminds you of the clean air and picturesque green of the forest. Both dark and light shades of green can be used in this manicure to create a harmonious and interesting look. You can use additional elements such as leaves, twigs or flowers painted on your nails to add texture and depth. This manicure is suitable for both everyday style and special occasions, giving your look a refreshing and natural look.


Here’s a quick guide to creating a Green Forest style manicure:
- Nail Preparation: Start by thoroughly cleaning your nail plate and removing any residue from previous polish. If necessary, trim the shape of the nails and remove the cuticle. Finish by applying a base coat to protect your nails and improve adhesion.
- Choosing colors: For a Green Forest manicure, choose shades that resemble natural shades of green. These can be dark green, olive, khaki, mint or forest green. You can also use shades of brown and beige to add texture and depth.
- Applying the nail polish: Start by applying a base color using your chosen shade of green. Apply two thin and even coats of nail polish on each nail, ensuring complete drying between coats.
- Decorative elements: To create a visual forest effect, you can add decorative elements. For example, you can use thin brushes or sharpening tools to draw trees, leaves or flowers on your nails. You can also use stickers or stencils depicting forest flora and fauna.
- Ombre Effect: To give your manicure a more natural and deep look, you can use the ombre effect. Apply a small amount of light green polish to a makeup sponge and gently apply it to the tips of your nails, creating a smooth transition from dark to light shade.
- Finish: Once the polish is completely dry, fix your manicure with a layer of top coat. This will help to preserve the color and design of your nails, as well as give them extra shine and durability.
- Thus, the Green Forest manicure will help you create a unique and stylish look that appeals to nature and tranquility, perfect for everyday wear or special events.
Here’s a brief description of the advantages and disadvantages of the Green Forest manicure:
Advantages:
- Natural look: A forest green manicure gives your nails a fresh and natural look, reminding you of nature and tranquility.
- Symbolism: Green color is associated with nature, growth and renewal, which makes this manicure a symbol of life, harmony and renewal.
- Versatility: Green manicure can be suitable for different seasons and events, especially in spring and summer, as well as for vacations in nature or themed parties.
- Wide choice of shades: Green color has many shades, from light and gentle to deep and saturated, which allows you to choose the perfect option for any image and mood.
Disadvantages:
- Limited combinations: Some shades of green can be difficult to combine with other colors, which can limit your design choices and manicure style.
- Shade intensity: Saturated shades of green can draw more attention than desirable, especially if it doesn’t match your style or look.
- Limited thematic options: A forest green manicure may be less appropriate for formal events or parties where a more elegant or formal look is desired.
- Difficulty in choosing a shade: Choosing the right shade of green can be difficult due to its variety and different variations, which requires extra time and effort in choosing.
11. Embellished Blue
Manicure “Embellished Blue” is a stylish and sophisticated design based on the blue color and decorated with various additional elements. The basis of this manicure is a blue shade of nail polish, which can be either dark and saturated, or light and delicate, depending on preference. Embellishments can include rhinestones, sequins, sequins, and designs or appliques. This manicure is perfect for special events or evening outings, giving your nails an elegant and glamorous look. It can also be a great accent to a casual look, adding a bright and stylish accent to your overall look.


Here’s a quick guide for creating a Blue with Embroidery manicure:
- Nail Preparation: Start by cleaning your nails of any previous nail polish residue and treating the cuticle. Next, shape your nails to your desired shape and apply a base coat to protect and strengthen the nail plate.
- Choosing the main color: To create a manicure in blue tones, choose the main shade of blue that you will use on your nails. It can be deep blue, light blue, navy blue or another shade of your choice.
- Applying the base color: Cover your nails with two even coats of your chosen blue polish. Allow each coat to dry completely before applying the next to avoid smearing or blurring the color.
- Preparing for embroidery: Once the base color has dried, prepare to create the embroidery on your nails. Choose an accent color (such as white or silver) for embroidery and pour some of this polish onto a palette or other surface to make it easier to work with.
- Creating Embroidery: Using a thin brush or sharpening tool, start creating patterns or designs on your nails to mimic embroidery. It can be anything from abstract patterns to flowers and plants. Work slowly and carefully to keep the patterns crisp and clean.
- Finishing: When you have finished your embroidery, give it some time to dry. Then apply a top coat to fix the manicure, give it a shine and increase its staying power.
- Thus, Blue with Embroidery manicure will help you create a unique and beautiful design that will attract attention and emphasize your personality.
Here is a brief description of the advantages and disadvantages of manicure with jewelry in blue:
Advantages:
- Originality: Manicure with jewelry in blue gives your nails an original and stylish look, drawing attention to them and emphasizing your personality.
- Variability: Blue color offers a wide range of shades and design possibilities, which allows you to find the perfect combination with jewelry to create a unique look.
- Versatility: Blue manicures with jewelry are suitable for a variety of events and occasions, whether it’s casual wear, a party, a wedding or a formal event.
- Durability and quality: When applied correctly and using quality materials, nail jewelry can be durable and long-lasting, maintaining its original look for a long time.
Disadvantages:
- Difficulty in everyday wear: Some nail jewelry can be uncomfortable or interfere with everyday activities such as typing or using a keyboard.
- Possibility of peeling off: Poor quality or improperly applied jewelry can peel off or become damaged, reducing the aesthetic appearance of the manicure and requiring additional maintenance.
- Limited combinations: Not all decorations go well with blue, so the choice of accessories and decor may be limited and require careful selection.
- Additional costs: An embellished manicure may require additional costs for jewelry and application materials, which may increase the cost of the manicure procedure.
12. Mixed Contrast
A Mixed Contrast manicure is a stylish design that combines contrasting colors and textures to create a unique effect on the nails. This design usually involves a combination of bright and saturated colors such as black, white, red or blue that create a striking contrast on the nails. Contrasting colors can be used either to cover the entire surface of the nail or to create patterns, lines or geometric shapes. Textural elements such as glossy and matte shades, glitter or rhinestones can further enhance the contrasting effect and add interest to the design. This manicure is ideal for those who prefer bold and expressive looks and can be a spectacular accent to your style.


Creating a Mixed Contrast manicure is a great way to add originality and brightness to your look. Here’s a quick tutorial:
- Preparing your nails: Start by cleaning your nails and treating the cuticle. Then shape your nails to your desired shape and apply a base coat to protect the nail plate and increase the durability of your manicure.
- Choice of colors: To create a contrasting effect, choose two bright colors that go well together. For example, it can be a combination of blue and orange, purple and yellow, green and pink and so on. Experiment with shades to find the most harmonious combination.
- Applying the base color: Apply one of the chosen colors to all nails as a base color. Allow the polish to dry completely before moving on to the next step.
- Creating contrast: Using a different color of your choice, add contrasting elements to each nail. This can be a stripe, dot, line or abstract pattern. Let your imagination and creative inspiration guide you.
- Finishing: Once you have finished creating the contrasting elements, give them some time to dry. Then apply a top coat to fix the design, give it shine and increase its staying power.
Here’s a rundown of the advantages and disadvantages of a mixed contrast manicure:
Advantages:
- Play of colors: Mixed contrast manicure allows you to create interesting and dynamic looks, using combinations of different colors and shades that attract attention and give a stylish look to your nails.
- Versatility: This type of manicure is suitable for different events and occasions, be it casual wear, a party, a date or a formal event, thanks to the possibility of choosing the right combination of colors and styles.
- Creativity: Mixed contrast manicure provides ample opportunities for creativity and experimentation with colors, patterns, textures and decorative elements, allowing each woman to create a unique and individual look on her nails.
- Style accentuation: The combination of contrasting colors on the nails can emphasize your style and taste, complementing the overall look and giving it a finished and fashionable look.
Disadvantages:
- Difficulty of selection: It is not always easy to find the perfect combination of contrasting colors, which would look harmoniously on the nails and would match your style and preferences.
- Time and labor intensive: Creating complex and detailed mixed contrast manicure designs can be time consuming and labor intensive, especially if special techniques or decorative elements are used.
- Not Always Appropriate: Some combinations of contrasting colors may be unsuccessful or inappropriate for certain events or circumstances, so it is important to choose the right color combinations depending on the specific situation.
- Experience Required: Creating intricate and beautiful mixed contrast manicure designs may require a certain level of experience and skill with nail techniques and materials.
Thus, a Mixed Contrast manicure will help you stand out from the crowd and emphasize your stylishness and personality.
13. Unusual and festive
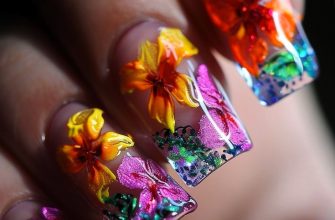
The Unusual and Festive manicure is a stylish and original design that is designed to emphasize your personality and add brightness to your look. This manicure often includes unconventional elements such as unusual patterns, crystals, rhinestones, or playful accents that draw attention and create a festive mood. With bright colors and creative patterns, this manicure is the perfect choice for special occasions, evening events, or holidays. An unusual and festive manicure will help you stand out from the crowd and create a unique look that will be remembered for a long time.


Creating a manicure that looks unusual and festive can add majesty and fun to your look. Here’s a quick guide:
- Preparing your nails: Start by cleaning your nails and treating the cuticle. Then, shape your nails to your desired shape and apply a base coat to protect your nail plate and increase the staying power of your manicure.
- Choosing colors and decorations: For an unusual and festive effect, choose bright and vibrant colors such as red, blue, green or purple. Then add decorative elements such as sequins, rhinestones, feathers, small beads or even miniature holiday accessories.
- Applying the base color: Apply the chosen base color to all nails. Allow the polish to dry completely before moving on to the next step.
- Adding Decor: Use decorative elements to add a festive mood to your manicure. This can be applying glitter to the tips of your nails, creating rhinestone patterns, or adding miniature holiday accessories such as Christmas tree balls or gift ribbons.
- Finishing: Once you’ve finished adding your decor, give it some time to dry. Then apply a top coat to fix the design, give it a shine and increase its staying power.
Here is a summary of the advantages and disadvantages of an unusual and festive manicure:
Advantages:
- Originality: Unusual and festive manicure provides an opportunity to stand out from the crowd and show your personality with bright and unconventional designs on your nails.
- Festive atmosphere: This type of manicure is ideal for special events and holidays such as parties, weddings, New Year’s Eve celebrations and birthdays, creating an atmosphere of fun and celebration.
- Creativity: A manicure that goes beyond traditional patterns and decorations allows you to be creative and imaginative, creating unique and memorable looks on your nails.
- Ability to experiment: There are no strict rules and restrictions in this kind of manicure, so you can experiment with different colors, textures, decorations and shapes to create the perfect look for any holiday or event.
Disadvantages:
- Time and labor: Creating an unusual and festive manicure can require significant time and labor, especially if complex designs or the use of special techniques and materials are required.
- Incompatible with everyday wear: Some unusual manicures may be uncomfortable or unsuitable for everyday wear due to the high degree of decoration or unusual elements that interfere with normal tasks.
- Limited versatility: Unusual and festive manicures may not always be appropriate for all events and occasions, especially if a strict dress code or conservative style is required.
- Experience and skills required: Complex and unconventional designs may require a certain level of skill and experience with manicure techniques and materials.
Thus, creating an unusual and festive manicure will help you look stylish and confident at any holiday or party.
14. 3D Neon
3D neon manicure is a bold and bright design that is designed to attract attention and emphasize your originality. This type of manicure includes the use of neon colors that create an effect of depth and volume, as well as three-dimensional elements such as beads, rhinestones or three-dimensional patterns. This is the perfect choice for those looking for something unusual and impressive to stand out at a party or special event. The 3D Neon manicure is eye-catching in its brightness and originality, making it the perfect choice for bold and fashionable individuals.


Creating a 3D Neon manicure is an exciting way to give your nails a colorful and spectacular look. Here’s a quick tutorial:
- Nail Preparation: Start by cleaning your nails and shaping them to your desired shape. Next, trim the cuticle and apply a base coat to protect the nail plate and increase the staying power of your manicure.
- Choosing bright colors: Choose bright and saturated colors that will look great in UV light. Bright pink, bright orange, bright green or bright blue nail polish are optimal options.
- Create voluminous elements: Use special materials such as gel or acrylic to create voluminous elements on your nails. These can be drops, flowers, abstract patterns or any other shapes you prefer.
- Adding a neon effect: Once you’ve created the three-dimensional elements, use neon gel or polish to give them a bright glow. Place your nails under a UV lamp to activate the glow and create a 3D Neon effect.
- Finishing the manicure: Once all elements of the manicure have dried, apply a top coat to lock in the design and give your nails an extra shine. Refer to the instructions for your chosen top coat.
Here’s a quick summary of the advantages and disadvantages of the 3D Neon manicure:
Advantages:
- Brightness and saturation: 3D effect combined with neon colors creates a bright and expressive design that attracts attention and lifts your mood.
- Originality: 3D Neon manicure provides an opportunity to create original and unique designs using three-dimensional elements, which makes it suitable for different events and occasions.
- Creativity: This type of manicure allows you to show your creativity and imagination, creating a variety of volumetric patterns and elements on the nails.
- Popularity: Bright neon shades and 3D designs are at the peak of popularity, making the “3D Neon” manicure a relevant and trendy choice.
Disadvantages:
- Difficulty to create: Achieving a spectacular 3D design may require some skill and experience with volumizing materials, which can be difficult for novice manicurists.
- Limited durability: Dimensional elements and decorations on nails may be less durable and prone to peeling or damage compared to classic coatings.
- Limited options for everyday use: Bright and voluminous designs may not always be suitable for everyday use or for the office, especially if a strict dress code is required.
- Not always comfortable to wear: Voluminous elements on the nails may cause discomfort or interfere with everyday tasks, especially if they are too tall or wide.
Creating a 3D Neon manicure is a fun and creative way to add vibrancy and originality to your look. Let your imagination roam to create unique and colorful designs.
15. Double tones
Manicure in the style of “double tones” is an interesting combination of two colors on the nails, creating an original and stylish image. This design is suitable for both everyday use and special occasions, adding a touch of personality to your look. You can choose contrasting colors for a spectacular look or more subdued shades for a more sophisticated style. Whatever your choice, a dual tone manicure will help you look stylish and confident in any situation.


Double tones nail art is a chic and trendy way to add depth and dimension to your manicure. Here’s a brief guide on how to achieve this stylish look:
- Prep Your Nails: Start by shaping and buffing your nails to your desired length and shape. Push back your cuticles and gently remove any excess skin around the nail bed. Clean your nails with nail polish remover to ensure they’re free from oils and residue.
- Apply Base Coat: Apply a clear base coat to protect your nails and help the nail polish adhere better. Allow it to dry completely before moving on to the next step.
- Choose Your Colors: Select two complementary or contrasting nail polish colors for your double tones design. For example, you could choose a light pink and a dark burgundy for a romantic look, or a light blue and a dark navy for a bold statement.
- Paint Your Nails: Apply the lighter color as the base coat on all your nails and let it dry completely. Then, using a small nail art brush or a nail polish striper, carefully apply the second color in a straight line diagonally across each nail. You can also use nail striping tape to create crisp lines.
- Blend the Colors: Use a clean nail art brush or a sponge to gently blend the two colors together where they meet to create a seamless transition. Be sure to work quickly before the polish dries to achieve a smooth gradient effect.
- Finish with Top Coat: Once you’re satisfied with the blend, allow your nails to dry completely before applying a clear top coat to seal in the design and add shine. This will also help prolong the wear of your manicure.
- Clean Up Edges: Use a small brush dipped in nail polish remover to clean up any polish that may have gotten on your skin or cuticles for a polished finish.
Benefits:
- Lasting effect: Double nail coloring creates a durable and rich color that lasts for a long time without chipping and fading.
- Original design: Using two shades of lacquer allows you to create original and stylish designs on the nails, attracting attention and favorably emphasizing individuality.
- Possibility to experiment: “Double tones” manicure provides ample opportunities for creativity and experimentation with colors, shades and textures, which allows you to create unique looks every time.
- Suitable for different occasions: This style of manicure is suitable for both everyday use and special occasions, depending on the shades and design chosen.
Disadvantages:
- Requires some skill: Creating the perfect double nail coloring requires some skill and care, especially when working with more complex designs.
- Time-consuming: The process of applying two shades of nail polish to the nails can be more time-consuming than a regular coat, especially when additional layers need to be added to achieve the desired effect.
- Difficulty in combining shades: Some color combinations may not look as spectacular as expected, so you need to choose shades carefully to create a harmonious look.
- Not always suitable for short nails: Some styles of double nail coloring require a certain length of nails, so it is not always suitable for short nails.
Double tones nail art offers endless possibilities for creativity and expression. Experiment with different color combinations, gradients, and patterns to create unique and eye-catching designs that reflect your personal style.
16. Freckles on nails
Freckles manicure is a creative and playful design that adds tenderness and charm to your image. This style is suitable for those who are looking for something unusual and original. You can create freckles on your nails using a dot brush and different shades of brown or reddish color to give them a realistic look. This design will perfectly complement your spring look, giving it playfulness and cheerfulness.


Freckles on nails is a charming and playful nail art design that adds a touch of whimsy to your manicure. Here’s a quick guide on how to achieve this fun look:
- Prep Your Nails: Start by shaping and buffing your nails to your desired length and shape. Push back your cuticles and remove any excess skin around the nail bed. Clean your nails with nail polish remover to ensure they’re free from oils and residue.
- Apply Base Coat: Apply a clear base coat to protect your nails and help the nail polish adhere better. Allow it to dry completely before moving on to the next step.
- Choose Your Colors: Select two contrasting nail polish colors for your freckles design. A light beige or nude color works well as the base, while a darker shade such as brown or tan will be used for the freckles.
- Paint Your Nails: Apply the lighter color as the base coat on all your nails and let it dry completely. Then, using a small dotting tool or the end of a bobby pin, dip it into the darker nail polish and lightly dot it onto your nails to create the freckles. Focus on applying the freckles randomly across each nail for a natural and playful effect.
- Add Variation: Vary the size and density of the freckles by applying more or less pressure with the dotting tool. You can also layer different shades of brown or tan to create depth and dimension.
- Finish with Top Coat: Once you’re satisfied with the freckles, allow your nails to dry completely before applying a clear top coat to seal in the design and add shine. This will also help prolong the wear of your manicure.
- Clean Up Edges: Use a small brush dipped in nail polish remover to clean up any polish that may have gotten on your skin or cuticles for a polished finish.
Here is a summary of the advantages and disadvantages of Freckles on nails manicure:
Advantages:
- Original design: Manicure with freckles on nails is a unique and original design that attracts attention and looks unusual.
- Natural look: Freckles on nails create a natural and cute image, reminding of spring mood and natural beauty.
- Easy to create: Creating a manicure with freckles does not require special professional skills or special materials, which makes it accessible to many manicure enthusiasts.
- Variability: You can experiment with the size, color and placement of freckles, creating varied and unique designs.
Disadvantages:
- Short staying power: Freckles on nails can quickly rub off or lose their original look due to daily exposure to nails.
- Difficulty in creating an even finish: Applying freckles to nails so that they look natural and even can require some dexterity and skill.
- Requires Careful Wearing: To keep freckles on your nails in good condition, you need to be careful when doing everyday tasks to avoid damaging them.
- Not always suitable for formal events: A freckle manicure, while attractive and interesting, may not be well suited for formal events or formal occasions.
Freckles on nails is a fun and easy nail art design that’s perfect for adding a playful touch to your look. Experiment with different colors and patterns to create unique and eye-catching designs that reflect your personal style.
17. Glitter Bomb
Glitter Bomb manicure is a bright and spectacular design that attracts attention and creates an impression. It is perfect for special occasions and holidays when you want to look confident and stylish. To create this design, use glitter polish or glitter powder to add shimmery accents to your nails. You can choose a single color or create a multi-color effect to accentuate your personality. This manicure gives your look a bold and radiant look, making you the star of any event.


Creating a glitter bomb manicure is a fantastic way to add sparkle and glamour to your nails. Here’s a step-by-step guide to achieve this dazzling look:
- Prep Your Nails: Begin by shaping and buffing your nails to your desired length and shape. Push back your cuticles and remove any excess skin around the nail bed. Clean your nails with nail polish remover to ensure they’re free from oils and residue.
- Apply Base Coat: Apply a clear base coat to protect your nails and provide a smooth surface for the glitter polish. Allow the base coat to dry completely before proceeding.
- Choose Your Glitter Polish: Select your favorite glitter nail polish for the bomb effect. You can choose a single color or a combination of colors for a more vibrant look.
- Apply Glitter Polish: Apply the glitter polish to your nails, starting from the base and working your way to the tip. You can apply multiple coats for extra sparkle, allowing each layer to dry completely before adding the next.
- Create Gradient Effect (Optional): For a gradient glitter bomb effect, you can apply the glitter polish heavier at the base of the nail and gradually fade it out towards the tip. This will create a stunning gradient effect that’s sure to turn heads.
- Add Extra Bling (Optional): If you want to take your glitter bomb manicure to the next level, you can add extra bling by applying rhinestones, studs, or glitter accents to your nails. Use a small dotting tool or tweezers to carefully place the embellishments onto your nails while the polish is still wet.
- Seal with Top Coat: Once you’re satisfied with the glitter coverage and any additional embellishments, seal your manicure with a clear top coat. This will help protect the glitter and add shine to your nails. Make sure to apply the top coat generously to ensure a smooth and long-lasting finish.
- Cleanup: Use a small brush dipped in nail polish remover to clean up any excess polish or glitter that may have gotten on your skin or cuticles for a clean and polished look.
- Final Touches: After your nails have completely dried, moisturize your cuticles and hands to keep them hydrated and looking their best.
Here’s a quick summary of the advantages and disadvantages of the Glitter Bomb manicure:
Advantages:
- Bright and glittery look: The Glitter Bomb manicure creates a bright and shiny look through the use of numerous sequins and glitter.
- Attracts attention: The sequins and glitter draw attention to the nails, making this manicure stand out and memorable.
- Suitable for different occasions: Glitter Bomb manicure is ideal for festive events, parties and other special occasions where a colorful and impressive look is required.
- Design Variation: There are many variations of the Glitter Bomb manicure, allowing you to choose the right style and color of glitter to suit your individual preferences.
Disadvantages:
- Difficulty with removal: Glitter and sequins can be difficult to remove, especially if they are applied in large quantities or glue is used.
- Can be difficult to create an even finish: Applying glitter and glitter so that it looks even and neat requires some skill and patience.
- Can damage the nail plate: Poor quality glitter or glitter can damage the nail plate when applied or removed, especially if applied too roughly.
- Not always suitable for everyday use: Because of its brightness and glittery effect, the Glitter Bomb manicure may not be very suitable for everyday wear or formal events.
With these simple steps, you can create a dazzling glitter bomb manicure that’s perfect for adding some sparkle to any occasion. Experiment with different glitter colors and techniques to customize your look and make it your own!
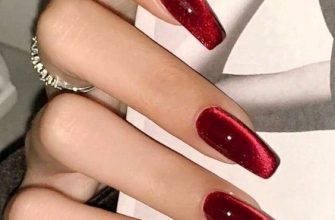
18. Jolly Cherry
The Jolly Cherry manicure is a playful and colorful design that gives your nails a fresh and eye-catching look. To create this style, use bright red nail polish as your base color and then add images of cherries or fruits on one or more nails. You can also use a thin brush or dotting tool to create details and add leaves or stems. This manicure is perfect for summer parties or for those who want to add some fun and playfulness to their look.


Creating a Jolly Cherry manicure is a delightful way to add a pop of color and fun to your nails. Follow these steps to achieve this playful look:
- Prep Your Nails: Start by shaping your nails to your desired length and buffing them to create a smooth surface. Push back your cuticles and remove any excess skin around the nail bed. Clean your nails with nail polish remover to ensure they’re free from oils and residue.
- Apply Base Coat: Apply a clear base coat to protect your nails and prevent staining. Allow the base coat to dry completely before moving on to the next step.
- Choose Your Colors: For the Jolly Cherry design, you’ll need a bright red nail polish for the base color and green nail polish for the stems and leaves of the cherries. You can also use white polish for added detail if desired.
- Apply Red Polish: Apply the red nail polish to all of your nails as the base color. You may need to apply two coats for full opacity, allowing each coat to dry completely in between.
- Add Cherry Details: Using a thin nail art brush or a toothpick, dip it into the green polish to create small stems at the base of each nail. Then, use the same technique to add two small leaves on either side of the stem to resemble cherry leaves.
- Create Cherry Accents (Optional): For a more detailed look, use a dotting tool or the end of a bobby pin dipped in white polish to add tiny dots on top of the red polish to represent cherries.
- Seal with Top Coat: Once you’re satisfied with the design, seal your manicure with a clear top coat to protect the polish and add shine. Make sure to apply the top coat evenly to ensure a smooth finish.
- Cleanup: Use a small brush dipped in nail polish remover to clean up any excess polish around the edges of your nails for a polished look.
- Final Touches: After your nails have dried completely, apply cuticle oil or hand cream to moisturize your hands and nails, leaving them soft and nourished.
Here’s a summary of the advantages and disadvantages of the Jolly Cherry manicure:
Advantages:
- Bright and fun design: The Jolly Cherry manicure creates a bright and fun look with its playful cherry design.
- Suitable for different events: This manicure is great for holiday events, parties or just to lift your spirits.
- Wide range of styles and variations: Jolly Cherry manicure can be done in different styles and variations, adding additional decorative elements or combining with other colors.
- Uniqueness and originality: The image of cherries makes this manicure original and unique, drawing attention to the nails.
Disadvantages:
- Requires certain skills: Creating a Jolly Cherry manicure may require certain skills and patience, especially if you are doing it yourself.
- Limited design choices: The cherry image may limit your choice of other design and decor elements, which may not always suit your preferences.
- Not always suitable for everyday use: The image of brightly colored cherries may be too bright for an everyday look, so a Jolly Cherry manicure may be more appropriate for special occasions.
- Requires careful maintenance: Like any other nail design, the Jolly Cherry manicure requires careful maintenance and regular refreshing to maintain its vibrant look.
With these simple steps, you can create a cheerful Jolly Cherry manicure that’s perfect for adding a touch of whimsy to your look. Experiment with different colors and techniques to customize your design and make it your own!
19. Velvet Tips
The Velvet Tips manicure is a sophisticated and textured design that gives your nails a luxurious look. To create this style, a velvet or matte nail polish is used in the base color and then a layer of special velvety effect polish is applied to the tips of the nails. This extra layer creates a soft and velvety feeling on the tips of the nails, adding an unusual and interesting accent to them. Velvet Tips manicure is suitable for both everyday look and special occasions, giving your style a special charm and sophistication.


Creating a Velvet Tips manicure is a luxurious way to add texture and sophistication to your nails. Here’s a step-by-step guide to achieve this elegant look:
- Prep Your Nails: Start by shaping your nails to your desired length and gently push back your cuticles. Buff the surface of your nails to create a smooth canvas for the polish.
- Apply Base Coat: Apply a clear base coat to protect your nails and help the polish adhere better. Allow the base coat to dry completely before moving on to the next step.
- Choose Your Colors: For the Velvet Tips design, you’ll need a nail polish in your desired base color and a matching or contrasting velvet effect polish for the tips. Popular base colors include nude, pastel, or deep shades, while the velvet effect polish adds texture to the tips.
- Apply Base Color: Apply your chosen base color to all of your nails and allow it to dry completely. You may need to apply two coats for full opacity, ensuring each coat dries thoroughly in between.
- Add Velvet Effect: Once the base color is dry, carefully apply the velvet effect polish to the tips of your nails. Start by applying a thin coat of the velvet polish to the free edge of each nail, slightly overlapping the base color for a smooth transition. Allow the velvet polish to dry for a few minutes.
- Apply Second Coat (Optional): Depending on the intensity of the velvet effect you desire, you can apply a second coat of the velvet polish to the tips once the first coat is dry. This will deepen the texture and color of the velvet effect.
- Seal with Top Coat: Once you’re satisfied with the velvet tips, seal your manicure with a clear top coat to protect the polish and add shine. Apply the top coat evenly to ensure a smooth finish and allow it to dry completely.
- Cleanup: Use a small brush dipped in nail polish remover to clean up any excess polish around the edges of your nails for a polished look.
- Final Touches: After your nails have dried completely, apply cuticle oil or hand cream to moisturize your hands and nails, leaving them soft and nourished.
Here’s a quick summary of the advantages and disadvantages of the Velvet Tips manicure:
Advantages:
- A dainty and elegant look: Velvet tips give your nails a sophisticated and elegant look, suitable for both everyday looks and special events.
- Texture effect: The corduroy texture creates an interesting and unique effect that attracts attention and adds originality to the manicure.
- Wide range of colors: Corduroy is available in a variety of shades, allowing you to find the perfect match for any style and mood.
- Durability: A properly executed manicure with corduroy tips can retain its look for a long time without losing texture and color saturation.
Disadvantages:
- Requires careful maintenance: Corduroy tips can be more prone to damage and loss of texture, so they require gentle handling and careful maintenance.
- Can be uncomfortable in everyday life: Because of the texture, corduroy tips can feel uncomfortable when performing everyday tasks such as typing or cleaning.
- Requires professional application: A corduroy tips manicure requires an experienced craftsman to achieve the perfect result, which can affect the cost of the treatment.
- Limited design choices: Due to the specific texture, corduroy tips can limit nail design choices, which may not suit all preferences and styles.
With these simple steps, you can create a stunning Velvet Tips manicure that’s sure to turn heads and add a touch of luxury to your look. Experiment with different base colors and velvet effect polishes to customize your design and make it your own!
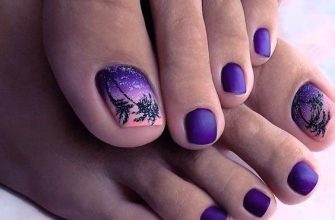
20. Pastel curls
Pastel Curls manicure is a delicate and playful design that makes nails look airy and light. To create this style, pastel shades of nail polish are used and applied to the nails in the form of abstract curls or waves. This design can be done on all nails as well as on the accent nail, giving your look tenderness and femininity. The “Pastel Curls” manicure is perfect for the summer season, adding lightness and freshness to your look.


Creating a Pastel Curls manicure is a whimsical and playful way to add a touch of charm to your nails. Here’s how you can achieve this delicate design:
- Prepare Your Nails: Start by shaping your nails to your desired length and gently push back your cuticles. Buff the surface of your nails to create a smooth canvas for the polish.
- Apply Base Coat: Apply a clear base coat to protect your nails and help the polish adhere better. Allow the base coat to dry completely before moving on to the next step.
- Choose Your Pastel Colors: Select a range of pastel shades for your curls. Popular choices include soft pinks, blues, purples, and yellows. You can use as many colors as you like to create a vibrant and playful look.
- Create the Curl Design: Using a thin nail art brush or a dotting tool, dip it into your chosen pastel polish and create swirling, curling patterns on each nail. Start from one side of the nail and gently drag the brush or dotting tool in a curved motion to create the curl effect. Repeat this process with different colors to create a variety of curls on each nail.
- Layer the Colors: Layer the pastel colors on top of each other to create depth and dimension in your design. You can overlap the curls and blend the colors together for a seamless transition.
- Add Details (Optional): If desired, you can add additional details to your design, such as small dots or accent lines between the curls. This will enhance the overall look and add extra interest to your manicure.
- Seal with Top Coat: Once you’re satisfied with your pastel curls, seal your manicure with a clear top coat to protect the design and add shine. Apply the top coat evenly to ensure a smooth and long-lasting finish.
- Cleanup: Use a small brush dipped in nail polish remover to clean up any excess polish around the edges of your nails for a neat and polished look.
- Final Touches: After your nails have dried completely, apply cuticle oil or hand cream to moisturize your hands and nails, leaving them soft and nourished.
Here’s a summary of the advantages and disadvantages of the Pastel Curls style manicure:
Advantages:
- Delicate and romantic look: Soft, pastel shades create a delicate and romantic look that is perfect for spring and summer seasons.
- Design Variation: Pastel colors allow you to play with different shades and combinations to create varied and unique designs.
- Suitable for different styles: Soft pastel shades can be incorporated into different styles and looks, from classic to trendy and extravagant.
- Suitable for different nail lengths: Pastel Curls manicure looks attractive on both short and long nails.
Disadvantages:
- May look too delicate: For some people, they may appear too delicate or childish, which may not suit all styles and looks.
- Require regular maintenance: Pastel shades can look dull or lose their brightness over time, so manicures require regular maintenance and refreshing.
- Not always appropriate for professional environments: Depending on specific dress code rules, Pastel Curls manicures may not be appropriate for professional environments.
With these simple steps, you can create a beautiful Pastel Curls manicure that’s perfect for adding a touch of whimsy to your look. Experiment with different color combinations and patterns to create your own unique and playful design!
21. Black and white
A black and white manicure is a classic and stylish choice that never goes out of style. The black and white palette creates an elegant and contrasting look suitable for any occasion. This design can be done in geometric patterns, abstract lines or simply by alternating black and white polish on different nails. A black and white manicure emphasizes your style and adds sophistication to your look, making it versatile and elegant.


Creating a black and white manicure offers endless possibilities for chic and sophisticated nail designs. Here’s a simple guide to achieving a stunning black and white manicure:
- Prepare Your Nails: Start by shaping your nails to your desired length and gently pushing back your cuticles. Then, buff the surface of your nails to create a smooth base for the polish.
- Apply Base Coat: Apply a clear base coat to protect your nails and help the polish adhere better. Allow the base coat to dry completely before moving on to the next step.
- Choose Your Colors: Select a black and a white nail polish for your manicure. You can opt for classic solid colors or choose from a variety of finishes like matte, glossy, or shimmer for added dimension.
- Create Your Design: There are numerous design options for a black and white manicure. You can keep it simple with alternating black and white nails, create geometric patterns, stripes, polka dots, or go for intricate nail art designs like swirls or floral motifs.
- Apply the Polish: Start by painting your nails with the base color – either black or white. Ensure that the first coat is thin and even, and allow it to dry completely before applying a second coat for full opacity.
- Add Your Design: Once the base color is dry, use a thin nail art brush or a nail art pen to create your chosen design with the contrasting color. Take your time and work carefully to achieve clean lines and precise details.
- Seal with Top Coat: Once your design is complete and dry, apply a clear top coat to seal the manicure and add shine. The top coat will also help protect your design and extend the wear of your manicure.
- Cleanup: Use a small brush dipped in nail polish remover to clean up any polish mistakes or smudges around the edges of your nails for a flawless finish.
- Moisturize: After your manicure is complete, hydrate your hands and nails with a nourishing hand cream or cuticle oil to keep them healthy and moisturized.
Here’s a rundown of the advantages and disadvantages of the Black and White manicure:
Advantages:
- Classic and classy look: A black and white manicure offers a classic and elegant look that suits any occasion and dressing style.
- Versatility: The black and white color palette can easily be combined with different styles and colors of clothing, making this manicure a versatile choice.
- Expressive: The contrast between black and white creates an expressive and memorable look that draws attention and emphasizes style.
- Suitable for different nail lengths: You can create a black and white manicure on both short and long nails, making it a versatile choice for everyone.
Disadvantages:
- Can look too strict: Some people may consider a black and white manicure too strict or formal for everyday wear.
- Requires careful maintenance: Black and white shades can be prone to stains and scratches more noticeably, so the manicure requires more care and maintenance to keep it clean and bright.
- Limited design options: Using only two colors can limit design options, so more creativity and attention to detail may be required to create a unique look.
With these steps, you can achieve a stylish and sophisticated black and white manicure that’s perfect for any occasion. Feel free to experiment with different designs and techniques to create a look that suits your style!
22. Cool Emerald
A manicure in cool shades of emerald color is a stylish choice that gives your look sophistication and elegance. This shade is great for any season and allows you to stand out from the crowd. You can choose a solid color design or combine emerald with other shades to create unique patterns and designs. Thanks to its deep saturation and cool shade, emerald manicure gives your nails a mysterious and attractive look.


Creating a cool emerald manicure brings a touch of elegance and sophistication to your nails. Here’s a guide to achieving this stylish look:
- Prepare Your Nails: Start by shaping your nails to your preferred length and gently pushing back your cuticles. Then, buff the surface of your nails to create a smooth base for the polish.
- Apply Base Coat: Apply a clear base coat to protect your nails and help the polish adhere better. Allow the base coat to dry completely before moving on to the next step.
- Choose Your Colors: Select a rich emerald green nail polish for your manicure. Opt for a shade that has cool undertones for a chic and modern look.
- Apply the Polish: Start by painting your nails with the emerald green polish. Apply the first coat in thin, even strokes, and allow it to dry completely before applying a second coat for full opacity.
- Add Accents (Optional): For added flair, consider adding accents to your manicure. You can create an accent nail with a glitter or metallic polish in a complementary shade, or add nail art accents like rhinestones or studs for extra sparkle.
- Seal with Top Coat: Once the polish is dry, apply a clear top coat to seal the manicure and add shine. The top coat will also help protect your manicure and extend its wear.
- Cleanup: Use a small brush dipped in nail polish remover to clean up any polish mistakes or smudges around the edges of your nails for a polished finish.
- Moisturize: After your manicure is complete, hydrate your hands and nails with a nourishing hand cream or cuticle oil to keep them healthy and moisturized.
Here is a summary of the advantages and disadvantages of the Cool Emerald style manicure:
Advantages:
- Elegant and classy look: Cool Emerald style manicure offers an elegant and trendy look that is suitable for both everyday wear and special occasions.
- Versatility: Emerald shades can go well with a variety of clothing styles and can be suitable for any time of the year.
- Subtle Accent: This manicure allows you to add a touch of color and brightness to your look while maintaining a classic and sophisticated look.
- Suitable for different nail lengths: You can create the Cool Emerald manicure on both short and long nails, making it a versatile choice for everyone.
Disadvantages:
- Limited shade selection: Although green shades can range from light green to dark emerald, the color choices can be limited compared to more popular shades such as red or pink.
- Doesn’t always suit all skin types: Some shades of emerald may not blend well with certain skin tones, so it’s important to choose the right shade for your skin tone.
- Requires careful maintenance: Like other bright manicure shades, Cool Emerald manicures may require more care and maintenance to keep their freshness and brightness.
With these steps, you can achieve a stunning cool emerald manicure that exudes sophistication and style. Experiment with different nail art techniques and accents to customize your look and make it your own!
23. Holographic Manicure
Holographic manicure is an ultra-trendy choice that adds a touch of futurism and magic to your look. This stylish design is created using a special holographic lacquer or powder that creates a three-dimensional glowing and shimmering effect when exposed to light. Holographic manicure is ideal for special occasions and evening outings when you want to look bright and unusual. It is available in a variety of options, from full nail coverage to patterns and accents, allowing every woman to find her own unique style. Create a manicure that will attract attention and emphasize your personality with holographic design.


Creating a holographic manicure adds a futuristic and mesmerizing touch to your nails. Here’s how you can achieve this eye-catching look:
- Prepare Your Nails: Begin by shaping your nails and gently pushing back your cuticles. Use a buffer to smooth the surface of your nails, creating a clean canvas for the holographic polish.
- Apply Base Coat: Apply a clear base coat to your nails and allow it to dry completely. The base coat helps the holographic polish adhere better and protects your nails from staining.
- Choose Your Holographic Polish: Select a holographic nail polish in the color of your choice. Holographic polishes come in various shades, ranging from subtle to bold, so pick one that suits your style.
- Apply the Polish: Start by applying a thin, even layer of holographic polish to your nails. Allow the first coat to dry completely before applying a second coat for maximum holographic effect. Be sure to cover the entire nail surface evenly.
- Optional: Add Nail Art: If you want to take your holographic manicure to the next level, consider adding nail art accents. You can use nail stencils, stamping plates, or freehand techniques to create intricate designs on your nails.
- Seal with Top Coat: Once the holographic polish is dry, seal your manicure with a clear top coat. This not only adds shine but also helps protect the holographic effect and prolong the wear of your manicure.
- Cleanup: Use a small brush dipped in nail polish remover to clean up any excess polish around the edges of your nails for a neat finish.
- Moisturize: After your holographic manicure is complete, moisturize your hands and cuticles with a nourishing hand cream or cuticle oil to keep them hydrated and healthy.
Here’s a rundown of the advantages and disadvantages of a holographic manicure:
Advantages:
- Unique effect: Holographic manicure creates an exciting and colorful effect that attracts attention.
- Variety of designs: Holographic polishes are available in different shades and hues, which allows you to create a variety of designs on your nails.
- Durability: A well applied holographic manicure can be long lasting and resistant to chipping and fading.
- On-trend: Holographic manicures are often seen on runways and in fashion magazines, making them a relevant choice for following the latest manicure trends.
Disadvantages:
- Difficulty of application: Some holographic polishes may require a specific application technique for optimal effect, which may require skill and experience.
- High cost: Quality holographic lacquers can be expensive, especially if you choose shades from top brands.
- Uncomfortable to remove: Some holographic polishes can be difficult to remove from the nails, especially if they contain large glitter particles or flakes.
- Limitations in everyday wear: For some areas of work or educational settings, holographic manicures may be too bright and showy, attracting unwanted attention.
With these steps, you can achieve a stunning holographic manicure that reflects light and captivates attention. Experiment with different holographic polishes and nail art techniques to create unique and personalized designs that showcase your style!
24. Smiley Face Nails
Smiley face nails are a fun and playful design that adds brightness and positivity to your look. This stylish manicure can be created in different ways: from drawing a smiley face on each nail covering to using special stickers or stickers. Smiley faces can be of different shapes and colors, allowing you to choose the one that best suits your mood and style. Smiley nails are great for everyday looks or for special occasions when you want to cheer yourself up and share positivity with others. Create a manicure that will delight you and others with its brightness and originality.


Creating smiley face nails is a fun and playful way to add a touch of whimsy to your manicure. Here’s how you can achieve this cheerful design:
- Prepare Your Nails: Start by shaping your nails to your desired length and gently pushing back your cuticles. Use a buffer to smooth the surface of your nails, creating a clean canvas for the design.
- Apply Base Coat: Apply a clear base coat to your nails and allow it to dry completely. The base coat helps protect your nails and provides a smooth surface for the nail polish.
- Choose Your Nail Polish: Select a bright and cheerful color for your smiley faces. Yellow is a classic choice, but you can also use other colors like pink, blue, or orange for a playful twist.
- Paint Your Nails: Apply two coats of your chosen nail polish color to your nails, allowing each coat to dry completely. Make sure the color is opaque and even for the best results.
- Create the Smiley Faces: Once the base color is dry, use a fine nail art brush or a dotting tool to create the smiley faces. Dip the tip of the brush or dotting tool into black nail polish and carefully draw two small dots for the eyes. Then, draw a curved line underneath the eyes to form the smile.
- Optional: Add Details: Get creative with your smiley faces by adding additional details like rosy cheeks or eyelashes. You can use different colors of nail polish or nail art pens to personalize each smiley face.
- Seal with Top Coat: Once your smiley faces are dry, seal your manicure with a clear top coat to protect the design and add shine. Be sure to apply the top coat evenly and allow it to dry completely.
- Cleanup: Use a small brush dipped in nail polish remover to clean up any excess polish around the edges of your nails for a neat finish.
- Moisturize: After your smiley face nails are complete, moisturize your hands and cuticles with a nourishing hand cream or cuticle oil to keep them hydrated and healthy.
Nail smiley faces are a fun and expressive way to express your personality and lift your mood. Here’s a brief description of their advantages and disadvantages:
Advantages:
- Playful design: Smiley faces add brightness and cheerfulness to your look.
- Individuality: You can choose different expressions of emoticons to emphasize your uniqueness and character.
- Easy to create: This design is simple enough to do at home or with the help of a professional craftsman.
- Versatility: Smiley faces are suitable for all ages and styles, they are uplifting and suitable for any occasion.
Disadvantages:
- Limited durability: Due to the complexity of the shape and fine details, emoji designs can quickly fade or peel off.
- Limited options: Compared to other designs, emojis can limit your choice of style and color palette.
- Skill required: Creating clear and beautiful smiley faces on your nails can take some skill and patience.
- Risk of Warping: When applying emojis with brushes or dots, there is a risk of fuzzy lines or warped images.
With these steps, you can create adorable smiley face nails that are sure to brighten your day and bring a smile to everyone’s face! Experiment with different colors and expressions to customize your manicure to suit your style and mood.
25. Foil French
Foil French is a modern incarnation of the classic French manicure, giving your nails a special chic and elegance. In this design, the tips of the nails stand out thanks to thin strips of foil, which create a spectacular contrast with the main color. Foil French allows you to play with colors and shades, creating unique and stylish combinations. This design is suitable for both everyday looks and special occasions, adding sophistication and grace to your nails. It perfectly complements any style and helps to stand out from the crowd thanks to its originality and uniqueness.


Creating a foil French manicure adds a touch of elegance and sophistication to your nails. Here’s a step-by-step guide to achieve this glamorous look:
- Preparation: Start by shaping your nails to your desired length and gently pushing back your cuticles. Use a buffer to smooth the surface of your nails, creating a clean canvas for the manicure.
- Base Coat: Apply a clear base coat to your nails and allow it to dry completely. The base coat helps protect your nails and provides a smooth surface for the foil.
- Choose Your Foil: Select a metallic foil in your desired color. Silver and gold are classic choices for a foil French manicure, but you can also choose other metallic shades for a modern twist.
- Apply Foil Adhesive: Once the base coat is dry, apply a thin layer of foil adhesive to the tips of your nails where you want to create the French manicure. Make sure the adhesive is evenly applied and covers the entire area you want to foil.
- Transfer Foil: Allow the foil adhesive to become tacky, usually within 1-2 minutes. Then, carefully place the metallic foil over the adhesive on each nail, pressing gently to ensure full contact.
- Remove Excess Foil: After applying the foil to all the nails, gently peel away the excess foil using a soft brush or your fingertips. This will leave behind the foil only on the areas with adhesive.
- Seal with Top Coat: Once the foil is in place, seal your manicure with a clear top coat to protect the design and add shine. Apply the top coat evenly over each nail, making sure to cover the foil completely.
- Cleanup: Use a small brush dipped in nail polish remover to clean up any excess foil or adhesive around the edges of your nails for a neat finish.
- Moisturize: After your foil French manicure is complete, moisturize your hands and cuticles with a nourishing hand cream or cuticle oil to keep them hydrated and healthy.
Benefits:
- Elegant and stylish look: Foil adds shine and sophistication to your manicure, giving your nails a luxurious look.
- Variety of colors and shades: Foil is available in a wide range of colors, allowing you to choose the right shade for any look or occasion.
- Longevity: With proper application and care, foil manicures can last longer than regular nail polish.
Disadvantages:
- Difficulty in application: Applying foil can require some dexterity and patience, especially when working with small details.
- Sensitivity to moisture: Foil manicures can become less durable in humid conditions or if they come in contact with water.
- Difficulty in repair: Correcting a foil manicure if damaged can require some skill and time.
Overall, foil manicures offer an elegant and stylish solution for creating unique nail designs, but require some preparation and careful maintenance to achieve the best results.
With these steps, you can create a stunning foil French manicure that adds a touch of glamour to your nails. Experiment with different foil colors and shapes to customize your manicure to suit your style and occasion.
As we conclude our exploration of these 25 stylish nail designs for 2024, it’s evident that creativity knows no bounds when it comes to expressing oneself through manicures. From timeless classics like the French manicure to bold and innovative designs like 3D neon, there’s something for everyone to try and experiment with.
These nail designs offer a gateway to a world of self-expression and individuality, allowing you to showcase your personality and style with every stroke of polish. Whether you prefer understated elegance or eye-catching glamour, these designs provide endless inspiration for your next manicure adventure.
So why not dive in and explore the world of nail art? With these stylish designs at your fingertips, you’re sure to make a statement and turn heads wherever you go. After all, life is too short for boring nails!