April marks the season of rejuvenation as nature begins to stir from its winter slumber. It’s a time of fresh starts, making it the perfect opportunity to revamp your manicure game!
- Blue nails:
- Advantages of blue manicure
- Blue manicures are a spectacular and popular choice, but they do have their drawbacks:
- Red manicure:
- How to do a red manicure:
- Advantages of red manicure:
- Disadvantages of red manicure:
- Diagonal manicure:
- How to make a diagonal manicure:
- Benefits of a diagonal manicure:
- Disadvantages of diagonal manicures:
- Bright manicure on short nails:
- How to make a bright manicure on short nails:
- Benefits of a bright manicure on short nails:
- Disadvantages of a bright manicure on short nails:
- Confetti manicure:
- How to make confetti manicure:
- Benefits of confetti manicure:
- Disadvantages of confetti manicure:
- Contrast manicure:
- A quick guide to the contrast manicure:
- Benefits of contrast manicures:
- Disadvantages of contrast manicure:
- Orange manicure:
- Step-by-Step Guide:
- Choosing the Right Shade:
- Advantages of Orange Manicure:
- Disadvantages of Orange Manicure:
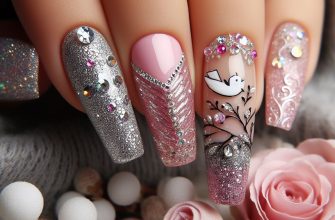
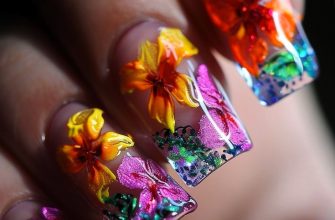
Blue nails:
Opting for blue nails adorned with delicate flowers is a chic and distinctive manicure choice suitable for any occasion. Blue pairs seamlessly with various hues, creating a harmonious and visually stunning ensemble. Whether you prefer soft pastels or bold saturations, incorporating flowers via painting, stickers, or rhinestones adds an extra touch of elegance. This style caters to women seeking a stylish and vibrant look without veering into overly provocative territory, making it versatile for nails of all lengths.


Advantages of blue manicure
- Versatility Blue color perfectly combines with most colors of clothing and is suitable for both business meetings and everyday wear. From pastel blue to rich navy blue, each shade can add a twist to your look.
- Richness of choice Blue color offers a variety of shades: from sky blue to dark blue. This gives you the opportunity to experiment with different styles and find the one that best emphasizes your personality.
- Psychological impact Blue is associated with calmness, stability and reliability. This makes it a great choice for those who want to create an impression of reliability and professionalism.
Blue manicures are a spectacular and popular choice, but they do have their drawbacks:
- Non-universality: Blue may not be as versatile as more neutral shades such as beige or pink. This can mean that a blue manicure isn’t suitable for all occasions or clothing styles.
- Visibility of wear and tear: Chips and scratches may be more visible on darker and brighter colors like blue. This means that you may need to refresh your manicure more frequently to maintain a flawless look.
- Difficulty combining colors: Combining a blue manicure with other colors of clothing or accessories can be more difficult than with more neutral tones. For example, blue can conflict with greens or some shades of red.
- Influence on perception: In some cultures, blue may have certain symbolic meanings that may not always be appropriate in certain social or professional situations.
- Not suitable for everyone: Blue manicures may not suit all skin types. For example, on very light or very dark skin, blue may not look as expressive as it does on medium tones.
Red manicure:
A red manicure exudes confidence and style, appealing to women of all ages. Its versatility shines through as it complements nails of various shapes and lengths, easily enhanced with gold accents, intricate designs, or a matte finish. Instantly commanding attention, a red manicure serves as a bold statement that accentuates the wearer’s personality.


How to do a red manicure:
- Nail preparation: Clean your nails and cuticles. The nails should be neatly trimmed and filed.
- Base coat: Apply a base coat to protect the nail and for better adhesion of the red polish.
- Application: Apply two coats of red nail polish, allowing each coat to dry completely. Additional coats may be required for a deeper, more intense color.
- Top Coat: Finish your manicure with a clear top coat for shine and extra chipping protection.
Advantages of red manicure:
- Versatility: A red manicure suits almost all occasions and dress styles, from business meetings to evening events.
- Classic: Red is a classic manicure choice that never goes out of style.
- Expressive: A red manicure is eye-catching and a style statement.
- Suitable for everyone: Red goes well with a variety of skin tones.
Disadvantages of red manicure:
- Visibility of imperfections: Chips and scratches on a red manicure can be more noticeable than on light or nude shades.
- Choosing a shade: Not every shade of red suits everyone. It’s important to choose a shade that harmonizes with your skin tone.
- Style Limitations: Although versatile, sometimes red can look too bright or flashy for some professional or social situations.
A red manicure is a time-tested choice that can complement any look and add a touch of confidence and style.
Diagonal manicure:
A variation of the color block technique, the diagonal manicure effortlessly elongates the nail plate, making it universally flattering for nails of any shape or length.


How to make a diagonal manicure:
- Preparation: Clean and file your nails, push back the cuticles and apply a base coat to protect the nail plate.
- Choosing colors: Decide on the colors you will use. Diagonal manicures often include two contrasting colors for a dramatic effect.
- Creating a diagonal: Use nail tape or special stickers to separate parts of the nail diagonally.
- Application: Apply the first color to one side of the diagonal, allow to dry completely, then carefully apply the second color to the other side.
- Finish: Once all coats are dry, remove the tape and apply a top coat for a shiny and long-lasting manicure.
Benefits of a diagonal manicure:
- Stylish look: Diagonal lines add originality and modernity to your manicure.
- Visual lengthening of nails: Diagonal lines can visually lengthen and slim your fingers.
- Versatile: Suitable for different occasions, from casual to formal.
- Personalization: Easily adaptable to personal preferences with a choice of different colors and widths of diagonal lines.
Disadvantages of diagonal manicures:
- Requires precision: Creating smooth and crisp diagonal lines can be difficult without some skill or special tools.
- Time to complete: This type of manicure can take longer than a simple one-color manicure due to the need for precision application and drying of multiple layers.
- Risk of unevenness: If the tape or stickers to create the lines are not removed carefully, it can damage the underlying layers of polish.
Diagonal manicure is a stylish and versatile choice that allows you to experiment with colors and shapes, making your look bright and memorable.
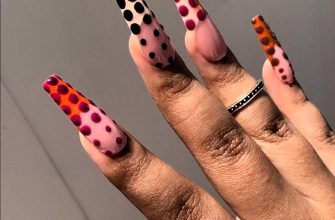
Bright manicure on short nails:
Embrace vibrant color blocks, negative space, and unconventional color combinations for a playful and modern take on short nails. Experiment with techniques like color stamping, kamifubiki, or watercolor drawings to unleash your creativity.


How to make a bright manicure on short nails:
- Nail preparation: Make sure your nails are clean, neatly trimmed and filed. Apply a base coat to protect your nails.
- Choosing a color: Choose a bright polish that suits your style and occasion. Bright colors such as pink, blue, green or yellow look great on short nails.
- Application: Apply two coats of bright nail polish to achieve color saturation. Allow each coat to dry thoroughly.
- Top Coat: Finish your manicure with a clear top coat for shine and extra protection against chipping.
Benefits of a bright manicure on short nails:
- Visual attention-getting: Bright colors draw the eye, accentuating well-groomed hands even with short nail lengths.
- Versatile: Suitable for everyday use and special occasions, adding brightness and style to any look.
- Ideal for summer: Bright colors are especially relevant in the warm season, lifting your mood and creating a sense of celebration.
- Quick drying: Short nails take less time to apply and dry.
Disadvantages of a bright manicure on short nails:
- High visibility of flaws: Any irregularities or mistakes in the application of polish will be more visible due to the brightness of the colors.
- Frequent correction: Bright colors may require more frequent correction as chipping and wear are more visible.
- Restrictions in professional environments: In some workplaces, bright colors may not be appropriate due to strict dress codes.
Confetti manicure:
Infuse whimsy into your manicure with jars of colorful confetti, perfect for creating stretches, minimalist designs, or covering the entire nail plate for a dazzling effect.


How to make confetti manicure:
- Nail preparation: Clean your nails, trim the cuticle and file your nails to the desired shape. Apply a base coat to protect the nail plate.
- Selecting a base color: Apply one or two coats of the chosen color as a background for the confetti. Allow the polish to dry completely.
- Confetti application: Use confetti polish or glue on small sequins and embellishments of your choice. Spread them evenly over the nail to create a confetti effect.
- Top Coat: Finish the design with a clear top coat to smooth the surface and prolong the longevity of the manicure.
Benefits of confetti manicure:
- Brightness and fun: Confetti manicure adds playfulness and creativity to your look, making it more colorful and unusual.
- Individuality: Thanks to the variety of sequins and embellishments each manicure can be unique.
- Versatility: Suitable for parties, holidays and other events where you can stand out and shine.
Disadvantages of confetti manicure:
- Difficulty in application: Distributing confetti evenly across the nail can require patience and precision.
- Removal: Removing this manicure can be tricky, especially if large sequins or metallic elements were used.
- Durability: Confetti can begin to peel off or lose its shine, requiring more frequent manicure touch-ups.
- Not for everyday wear: Because of its brightness and extravagance, confetti manicures may not be appropriate in professional or casual settings.
A confetti manicure is a great way to add festivity to your look, but it’s important to keep in mind its practical aspects and where it’s used.
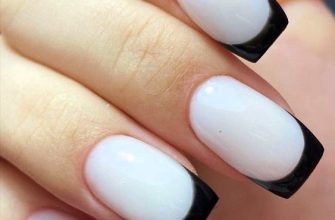
Contrast manicure:
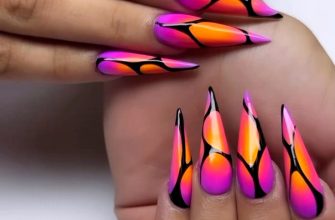
Elevate your style with an eye-catching contrast manicure, allowing you to play with bold color combinations like black and orange, white and blue, or yellow and purple, adding a pop of excitement to your look.


A quick guide to the contrast manicure:
- Preparation: Start by cleaning your nails and cuticles. Then apply a base coat to protect your nails.
- Color Palette: Choose two contrasting colors to create a spectacular visual contrast. Don’t be afraid to experiment!
- Process: Apply the first color as a base coat on all nails. Once completely dry, use the second color to create a design. This can be a stripe, dot or other pattern.
- Finish: Once the design is complete, use a top coat to protect and add shine.
Benefits of contrast manicures:
- Expressiveness: Contrasting colors create an impressive visual effect, emphasizing individuality and style.
- Versatility: Contrast manicure is suitable for different events and everyday use, adding brightness and vitality to the image.
- Creativity: This style of manicure allows you to experiment with different colors and patterns, expressing your creativity and imagination.
Disadvantages of contrast manicure:
- Neatness required: Creating a contrasting design may require more care and precision to avoid smearing colors.
- Drying Time: Using multiple colors can increase the drying time of the manicure, requiring patience and care in the process.
- Skills: Some contrast manicure designs may require some skill and experience, especially when creating complex patterns.
By following these simple steps and considering both the advantages and disadvantages of contrast manicure, you will be able to create a unique and stylish design that will emphasize your personality and creative taste.
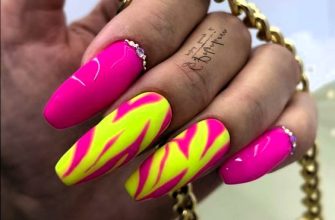
Orange manicure:
Explore matte gradients and bursts of vivid hues to achieve a striking orange manicure. Experiment with combinations such as yellow and green, orange and pink, or blue and purple for a vibrant and energetic look.


Step-by-Step Guide:
- Preparation: Start by cleaning and shaping your nails to your desired length and shape.
- Base Coat: Apply a clear base coat to protect your nails and ensure smooth application of the orange polish.
Choosing the Right Shade:
- Variety of Hues: Explore the spectrum of orange shades, from bright tangerine to deep coral, to find the perfect match for your style and skin tone.
- Finish Options: Decide between a glossy or matte finish based on your personal preference and the occasion.
Advantages of Orange Manicure:
- Bold Statement: Orange nails make a bold fashion statement, adding a pop of color and personality to any look.
- Versatility: The orange manicure complements a wide range of outfits and occasions, from casual to formal settings.
- Trendy and Timeless: Orange is a trendy color choice that also possesses timeless appeal, ensuring your manicure stays chic season after season.
Disadvantages of Orange Manicure:
- Staining: Some orange polishes may have a tendency to stain nails, requiring extra care during application and removal.
- Color Matching: Finding the right shade of orange that complements your skin tone can be challenging, requiring experimentation.
- Maintenance: Bright colors like orange may show chips and imperfections more visibly, requiring more frequent touch-ups to maintain a polished look.
In conclusion, as April heralds the season of renewal and rejuvenation, it presents the perfect opportunity to refresh your manicure and embrace new trends. Whether you opt for the chic and distinctive allure of blue nails adorned with delicate flowers, the timeless confidence of a red manicure, or the playful creativity of bright and colorful designs, there’s a style to suit every preference and occasion. From elegant diagonals to whimsical confetti, the variety of options allows for endless experimentation and self-expression. So, let your creativity flourish and make a statement with your manicure this April, welcoming the season with style and flair.